配置Nagios监控服务器(图)
部署Nagios监控服务器:
(一)下载所需软件包
1.nagios.3.2.0.tar.gz Nagios的主程序
- [root@UnixHot src]# wget http://prdownloads.sourceforge.n ... nagios.3.2.0.tar.gz
2.nagios-plugins-1.4.13.tar.gz Nagios 的插件
- [root@UnixHot src]# wget http://prdownloads.sourceforge.n ... ugins-1.4.13.tar.gz
3.nrpe-2.12.tar.gz 代理检测程序
- [root@UnixHot src]# wget http://prdownloads.sourceforge.n ... os/nrpe-2.12.tar.gz
- [root@UnixHot src]# ls
- nagios-3.2.0.tar.gz nagios-plugins-1.4.13.tar.gz nrpe-2.12.tar.gz
(二)安装Nagios
官方的安装文档:http://nagios.sourceforge.net/docs/3_0/quickstart-fedora.html
1.安装前的依赖检查
- [root@UnixHot ~]# rpm -q httpd php gcc glibc glibc-common gd gd-devel
2.创建Nagios账户和组
- [root@UnixHot src]# useradd -m nagios
- [root@UnixHot src]#groupadd nagcmd
- [root@UnixHot src]# usermod -a -G nagcmd nagios
- [root@UnixHot src]#usermod -a -G nagcmd apache
3.编译安装
- [root@UnixHot src]# tar xvf nagios-3.2.0.tar.gz
- [root@UnixHot src]# cd nagios-3.2.0
至于每一步的具体意思,我不再详述,因为运行完毕后,提示信息会明确的告诉你,它干了什么,是怎么干的。当然,还有一个***的办法,就是看Makefile文件,里面都会有注释的。
参考Makefile文件
- [root@UnixHot nagios-3.2.0]# less Makefile
- [root@UnixHot nagios-3.2.0]# ./configure --with-command-group=nagcmd \
- --with-nagios-user=nagios \
- --with-nagios-group=nagios
- [root@UnixHot nagios-3.2.0]# make all
- [root@UnixHot nagios-3.2.0]# make install
- [root@UnixHot nagios-3.2.0]# make install-init (生成init启动脚本)
- [root@UnixHot nagios-3.2.0]# make install-config (生成一些模板配置文件)
- [root@UnixHot nagios-3.2.0]# make install-commandmode (设置相应的权限)
- [root@UnixHot nagios-3.2.0]# make install-webconf (生成Apache配置文件nagios.conf)
4.为Nagios设置Web验证的密码
(注意***次添加用户用-c选项,以后再添加千万别在用这个选项了,会覆盖以前的所有用户的,这个在RHCE考前冲刺我已经讲了。)
- [root@UnixHot nagios-3.2.0]# htpasswd -c /usr/local/nagios/etc/htpasswd.users nagiosadmin
5.设置Nagios的开机启动
- [root@UnixHot ~]# chkconfig --add nagios
- [root@UnixHot ~]# chkconfig nagios on
6.修改SELinux
两种方法:
***种最直接,关闭SELinux,对于SELinux不是很熟悉的用户,请选择此。
- [root@UnixHot nagios-3.2.0]# cat /etc/sysconfig/selinux
- SELINUX=disabled
第二种给打上正确的安全脉络。
- chcon -R -t httpd_sys_content_t /usr/local/nagios/sbin/
- chcon -R -t httpd_sys_content_t /usr/local/nagios/share/
(三)安装Nagios的插件nagios-plugin
插件是Nagios扩展功能的强大武器,一般好的软件,都支持插件扩展,你可以根据实际的应用,自己开发插件。
- [root@UnixHot src]# tar xvf nagios-plugins-1.4.13.tar.gz
- [root@UnixHot src]# cd nagios-plugins-1.4.13
- [root@UnixHot nagios-plugins-1.4.13]# ./configure --prefix=/usr/local/nagios --with-nagios-user=nagios --with-nagios-group=nagios
- [root@UnixHot nagios-plugins-1.4.13]# make && make install
(四)配置检测主机是否存活
1.配置文件概述
如果安装上面的步骤,安装完成后,配置文件在安装时放在了/usr/local/nagios/etc/目录下
- [root@UnixHot ~]# cd /usr/local/nagios/etc
- [root@UnixHot etc]# ls -l
- -rw-rw-r-- 1 nagios nagios 11408 08-30 11:55 cgi.cfg (CGI配置文件)
- -rw-r--r-- 1 root root 26 08-30 11:56 htpasswd.users (Apache的验证密码文件)
- -rw-rw-r-- 1 nagios nagios 43776 08-30 11:55 nagios.cfg (主配置文件)
- drwxrwxr-x 2 nagios nagios 4096 08-30 11:55 objects (对象定义文件目录)
- -rw-rw---- 1 nagios nagios 1340 08-30 11:55 resource.cfg (资源配置文件)
我们修要修改的的是nagios.cfg 和 objects 目录下的文件,来检测主机是否存活。
2.主配置文件nagios.cfg的配置
主配置文件的内容很多,对于这个版本,我们需要修改和添加的主要是对象配置文件,即:cfg_file=
- cfg_file=/usr/local/nagios/etc/objects/commands.cfg (命令定义文件)
- cfg_file=/usr/local/nagios/etc/objects/contacts.cfg (联系人信息定义文件)
- cfg_file=/usr/local/nagios/etc/objects/contactgroups.cfg (添加此行联系人组定义文件)
- cfg_file=/usr/local/nagios/etc/objects/hosts.cfg (添加此行 主机定义文件)
- cfg_file=/usr/local/nagios/etc/objects/hostgroups.cfg (添加此行 主机组定义文件)
- cfg_file=/usr/local/nagios/etc/objects/services.cfg (添加此行 服务定义文件)
- cfg_file=/usr/local/nagios/etc/objects/timeperiods.cfg (时间周期定义文件)
- cfg_file=/usr/local/nagios/etc/objects/templates.cfg
- # Definitions for monitoring the local (Linux) host
- #cfg_file=/usr/local/nagios/etc/objects/localhost.cfg (注释掉此行)
3.主机定义文件的配置
- [root@UnixHot etc]# vi objects/hosts.cfg
- define host{
- host_name Nagios-Server
- alias Nagios Server
- address 192.168.0.206
- check_command check-host-alive
- check_interval 5
- retry_interval 1
- max_check_attempts 5
- check_period 24x7
- process_perf_data 0
- retain_nonstatus_information 0
- contact_groups sagroup
- notification_interval 30
- notification_period 24x7
- notification_options d,u,r
- }
- define host{
- host_name Java-Server
- alias Java Server
- address 192.168.0.157
- check_command check-host-alive
- check_interval 5
- retry_interval 1
- max_check_attempts 5
- check_period 24x7
- process_perf_data 0
- retain_nonstatus_information 0
- contact_groups sagroup
- notification_interval 30
- notification_period 24x7
- notification_options d,u,r
- }
- define host{
- host_name Oracle-Server
- alias Oracle Server
- address 192.168.0.155
- check_command check-host-alive
- check_interval 5
- retry_interval 1
- max_check_attempts 5
- check_period 24x7
- process_perf_data 0
- retain_nonstatus_information 0
- contact_groups sagroup
- notification_interval 30
- notification_period 24x7
- notification_options d,u,r
- }
- define host{
- host_name MySQL-Server
- alias MySQL Server
- address 192.168.0.100
- check_command check-host-alive
- check_interval 5
- retry_interval 1
- max_check_attempts 5
- check_period 24x7
- process_perf_data 0
- retain_nonstatus_information 0
- contact_groups sagroup
- notification_interval 30
- notification_period 24x7
- notification_options d,u,r
- }
4.主机组定义文件的配置
- [root@UnixHot etc]# vi objects/hostgroups.cfg
- define hostgroup {
- hostgroup_name System-Admin
- alias system Admin
- members Nagios-Server,Oracle-Server,Java-Server,MySQL-Server
- }
5.服务定义文件的配置
- [root@UnixHot etc]# vi objects/services.cfg
- define service {
- host_name Nagios-Server
- service_description check-host-alive
- check_period 24x7
- max_check_attempts 4
- normal_check_interval 3
- retry_check_interval 2
- contact_groups sagroup
- notification_interval 10
- notification_period 24x7
- notification_options w,u,c,r
- check_command check-host-alive
- }
- define service {
- host_name Oracle-Server
- service_description check-host-alive
- check_period 24x7
- max_check_attempts 4
- normal_check_interval 3
- retry_check_interval 2
- contact_groups sagroup
- notification_interval 10
- notification_period 24x7
- notification_options w,u,c,r
- check_command check-host-alive
- }
- define service {
- host_name Java-Server
- service_description check-host-alive
- check_period 24x7
- max_check_attempts 4
- normal_check_interval 3
- retry_check_interval 2
- contact_groups sagroup
- notification_interval 10
- notification_period 24x7
- notification_options w,u,c,r
- check_command check-host-alive
- }
- define service {
- host_name MySQL-Server
- service_description check-host-alive
- check_period 24x7
- max_check_attempts 4
- normal_check_interval 3
- retry_check_interval 2
- contact_groups sagroup
- notification_interval 10
- notification_period 24x7
- notification_options w,u,c,r
- check_command check-host-alive
- }
6.联系组定义文件配置
- [root@UnixHot etc]# vi objects/contactgroups.cfg
- define contactgroup {
- contactgroup_name sagroup
- alias system administrator group
- members nagiosadmin
- }
7.修改目录的所有者
- [root@UnixHot etc]# chown -R nagios:nagios objects/
8.检测配置文件是否正确
- [root@UnixHot etc]# /usr/local/nagios/bin/nagios -v /usr/local/nagios/etc/nagios.cfg
- Total Warnings: 0
- Total Errors: 0
如果都是0说明配置成功了,如果有错误,好好检查一下。
9.启动Nagios服务
- [root@UnixHot etc]# /etc/init.d/httpd restart
- [root@UnixHot etc]# /etc/init.d/nagios start
(五)***部分功能测试
在浏览器输入网址:http://192.168.0.206/nagios/
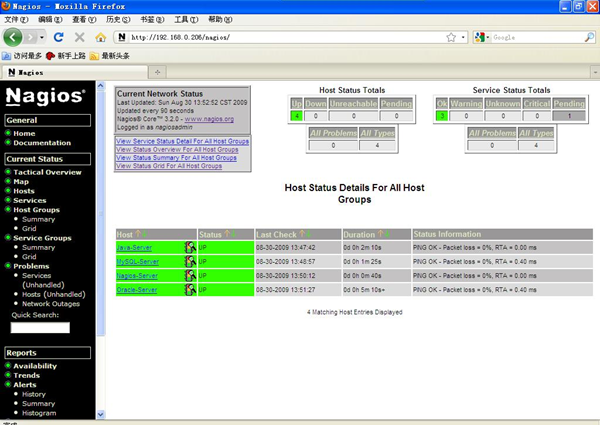
***部分的功能已经实现了,就是简单的监控四台服务器是否存活,当然,对于系统监控来说,这是远远不够的。配置Nagios监控服务器OK
【编辑推荐】
Ubuntu安装运行Nagios
运维监控Nagios
验证Nagios的工作状态(图)